2020-10-21 10:56:09
Win10系统怎么在局域网中传输文件?现在Win10系统已经相当普及,但依然有不少用户不会使用,下面就给大家介绍Win10系统在局域网中传送文件的方法。
操作方法:
1.鼠标右键需要传输的文件,在弹出的菜单中选择共享,然后点击“特定用户”打开。

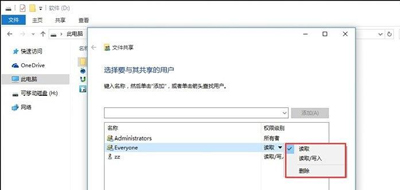
2.在弹出的文件共享界面中添加用户,如果是对对局域网内的所有用户开放,就选择everyone账户。

3.接着选择权限级别,根据实际需要选择即可。
4.点击下一步就完成文件共享设置了。

5.其他用户输入您电脑的IP地址,就可以访问需要传的文件了。